Your Home Deserves a Painter You Can Trust
How long does it take for drywall compound to dry? Premixed drywall joint compound commonly needs about 24 hours to dry between coats under normal indoor conditions, while setting type compound can harden in roughly 20, 45 or 90 minutes depending on the product. Actual drying time changes with application thickness, temperature, humidity, airflow and the type of compound being used.
TL;DR
- Premixed joint compound: Usually about 24 hours between coats, but thicker applications or humid conditions can take longer.
- Setting type compound: Often hardens in about 20 to 90 minutes, depending on the product. Hardening time is not the same as complete drying.
- Thin coats dry faster than thick patches, especially when the room has moderate temperature, lower humidity and good ventilation.
- Look for uniform color, a firm surface and dry dust when sanding before applying another coat or paint.
- Rushing the process can lead to soft compound, poor sanding, visible seams, cracking or paint problems.
Typical Drywall Compound Drying Times
There is no single drying time that applies to every drywall repair. The first thing to identify is the type of drywall compound. Most homeowners encounter either premixed joint compound or setting type compound. They behave differently and should not be treated as interchangeable.
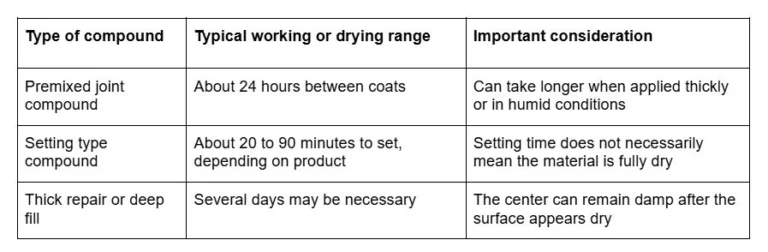
These are general ranges, not guarantees. Product instructions should take priority because different compounds have different formulations and recommended application methods.
Premixed compound dries primarily as moisture leaves the material. That means the surrounding environment has a major effect on how quickly it becomes ready for sanding and additional coats.
Setting type compound uses a chemical setting reaction. The number printed on the bag, such as 20, 45 or 90, generally refers to the approximate setting time under specified conditions. That does not mean the finished repair should automatically be sanded or painted as soon as that period has passed.
Why Does Drywall Compound Take So Long to Dry?
The drying process is mainly about moisture leaving the joint compound. When a thin layer is spread over drywall seams, some moisture can escape relatively quickly. A thicker patch contains considerably more moisture and the material has less exposed surface area relative to its volume.
That is why a thin skim coat can dry much faster than a deep repair. Several conditions determine how quickly this happens.
Temperature
Moderate indoor temperatures generally provide better drying conditions than very cold rooms. If the room is cold, moisture leaves the compound more slowly. This can make a repair remain darker, softer or cooler to the touch for longer than expected.
Avoid trying to compensate for a cold room by applying extreme heat directly to the repair. Rapid or uneven drying can create its own problems.
Humidity
Humidity is one of the biggest factors affecting premixed joint compound drying time. When indoor air already contains a lot of moisture, the water in the compound has a harder time evaporating into the surrounding air. A repair may therefore take significantly longer to dry on a humid day than it would in a dry room. This can be especially noticeable during humid seasons in areas such as Massachusetts.
Ventilation
Air movement helps move moisture away from the surface. A room with reasonable ventilation can dry joint compound more effectively than a closed room with stagnant air. This does not mean you need powerful airflow directly across the repair. Excessive airflow can dry the surface faster than the underlying material.
The goal is to maintain reasonable air circulation rather than force the compound to dry as quickly as possible.
Thickness of the Application
Thickness has a major effect on drying. A thin layer spread over a drywall seam may dry within the expected time range. A large amount of compound used to fill a deep hole can take considerably longer.
This is one reason experienced drywall finishers generally build up deeper repairs in stages instead of trying to fill a large depression with one heavy application. The outside can appear dry while moisture remains deeper inside the patch.
Premixed Joint Compound vs Setting Type Compound
Understanding the difference between these materials makes drywall finishing much easier.
Premixed Joint Compound
Premixed joint compound, sometimes called drywall mud, comes ready to use. It is commonly used for:
- Taping drywall seams.
- Covering drywall tape.
- Applying second and finishing coats.
- Skim coating.
- Filling shallow imperfections.
- General drywall repair.
Its drying time is affected heavily by temperature, humidity, ventilation and coat thickness. A thin coat may be ready within roughly a day under favorable conditions. A thicker repair can take substantially longer.
Setting Type Compound
Setting type compound is supplied as a dry powder and mixed with water before use. It is available in different setting times. A product labeled for a shorter setting period hardens faster than one intended to remain workable longer.
Setting type compound can be useful for repairs where a faster turnaround is needed, but the label’s setting time should not be interpreted as a universal sanding or painting schedule. Some repairs may require additional drying before finishing, particularly when the application is thick.
Book Your Free Estimate Today!
Ready to transform your space? Our team is here to help you get started with a no-obligation, on-site estimate. Whether it’s a quick refresh or a full makeover, we’ll guide you every step of the way.
How Can You Tell When Drywall Compound Is Dry?
The clock is useful, but the condition of the repair matters more. Before sanding or applying another coat, inspect the compound carefully.
1. Check the Color
Dry joint compound generally has a more uniform appearance than damp compound. Dark, grayish or noticeably different areas can indicate that moisture is still present. A repair should not be judged only by the outermost surface.
2. Check the Firmness
Lightly touching the surface can provide useful information. Dry compound should feel firm. If it feels soft, unusually cool or gives slightly under light pressure, give it more time. Do not press hard enough to damage the repair.
3. Look at the Edges and Thick Areas
Pay particular attention to the center of a patch and any areas where the compound was applied heavily. Thin edges can appear dry before the thicker middle section has finished drying. This is a common reason a repair can look ready at first glance but still cause trouble during sanding.
4. Test the Sanding Dust
When the compound is dry enough to sand, the material should generally produce dry, powdery dust. If the sanding material feels soft, gummy or clogs the sandpaper quickly, the compound may still contain too much moisture. Stop rather than forcing the process. Allowing additional drying time is usually easier than trying to correct a damaged repair.
How Long Should You Wait Between Coats?
For ordinary premixed joint compound, about 24 hours is a common starting point between coats under favorable indoor conditions. That does not mean every coat will be ready exactly 24 hours later.
A thin coat in a warm, reasonably dry room may be ready sooner. A heavy application in a cool or humid room may require more time. The sequence generally looks like this:
- Apply the first coat over the taped seam or repaired area.
- Allow it to dry thoroughly.
- Sand or scrape away significant ridges and imperfections if needed.
- Apply the next coat.
- Allow the second coat to dry.
- Sand and inspect the surface.
- Apply a finishing coat if necessary.
- Complete final sanding and preparation before primer and paint.
The goal is not to hit a specific number of hours. The goal is to make sure the previous layer has dried enough to support the next step.
When Should You Sand Drywall Compound?
Sanding should begin after the compound has dried sufficiently. If you sand too early, the abrasive can pull at the compound rather than simply smoothing it. This can create gouges, soft spots, uneven edges and additional work.
For a dry repair, sanding should produce a relatively dry powder rather than sticky or gummy material.
Use the least amount of sanding necessary to achieve a smooth surface. Excessive sanding can expose drywall paper or tape, particularly around seams. For larger drywall finishing jobs, careful application can reduce the amount of sanding needed later.
Book Your Free Estimate Today!
Ready to transform your space? Our team is here to help you get started with a no-obligation, on-site estimate. Whether it’s a quick refresh or a full makeover, we’ll guide you every step of the way.
Can a Fan Make Drywall Compound Dry Faster?
Yes, air circulation can help, but a fan is not a timer. A fan can improve airflow and help moisture move away from the surface. This may shorten drying time under suitable conditions, especially in a room with poor air circulation. The result depends on:
- Room temperature.
- Indoor humidity.
- Air movement.
- Compound thickness.
- Size of the repair.
- Type of compound.
- Existing ventilation.
Positioning a fan so it blasts directly against a wet patch is not necessarily the best approach. Moderate circulation throughout the room is generally more useful than aggressive airflow on one small area.
Can Heat Speed Up Drywall Compound Drying?
Increasing room temperature within a normal indoor range can help drying, but using intense heat to force a repair dry is not a good substitute for proper conditions.
A space heater placed too close to a repair can create uneven drying and may present a fire or property hazard.
If the room is unusually cold, bringing it to a normal, comfortable indoor temperature and maintaining reasonable air circulation is a better approach than applying concentrated heat to the wall.
What Happens If You Paint Over Wet Joint Compound?
Painting before the joint compound has dried can create several problems. The most immediate issue is that the repair may not be stable enough for primer and paint. Sanding marks, soft areas or imperfections can become more difficult to correct once they are coated. You may also notice:
- Uneven sheen.
- Visible drywall seams.
- Texture differences.
- Poor looking patches.
- Continued moisture beneath the coating.
- Additional sanding and repainting work.
Primer is especially important over fresh drywall compound because joint compound is porous and can absorb paint differently from the surrounding painted surface.
Before painting, the repair should be completely dry, properly sanded, dust free and ready to receive primer.
Common Drywall Compound Drying Mistakes
Many drywall problems come from trying to save time during a step that needs patience.
1. Applying One Thick Coat Instead of Several Thin Coats
A deep hole may seem easier to fill in one pass, but thick compound takes longer to dry and can be harder to finish cleanly. For deeper repairs, multiple applications are often more practical.
2. Assuming the Surface Is Dry Because It Looks Dry
The surface can appear dry while the material underneath is still damp. Check the thicker portions of the repair rather than relying only on appearance.
3. Ignoring Humidity
A drying schedule that works well in a dry room may not work the same way in a humid room. Give the compound more time when conditions are working against you.
4. Sanding Too Soon
Soft compound does not sand like fully dried compound. Trying to force the process can damage the repair.
5. Painting Without Proper Preparation
Drying is only one part of drywall finishing. The surface also needs proper sanding, cleaning and priming before the final paint is applied.
Book Your Free Estimate Today!
Ready to transform your space? Our team is here to help you get started with a no-obligation, on-site estimate. Whether it’s a quick refresh or a full makeover, we’ll guide you every step of the way.
When Should You Use Setting Type Compound?
Setting type compound can make sense when you need a material that hardens more quickly than conventional premixed compound.
It is commonly useful for certain drywall repairs, especially when the repair needs to progress through multiple stages without waiting a full day for every thin application.
However, faster setting does not eliminate the need for proper finishing. You still need to mix it correctly, apply it properly, allow sufficient hardening and drying and sand it at the right stage for the specific product. Always follow the manufacturer’s instructions for the particular compound you purchased.
When Professional Drywall Help May Make Sense
Small nail holes, minor dents and short seams are often manageable for homeowners who are comfortable with basic drywall work. Larger or more complicated repairs can be different. Professional drywall finishing may be worth considering when you are dealing with:
- Large damaged areas.
- Extensive drywall seams.
- Water damaged drywall.
- Cracked or failing tape.
- Multiple layers of old repair compound.
- Ceiling repairs.
- Large skim coat projects.
- Repairs that need to blend into an existing finished wall.
- A large area that needs to be ready for painting.
The difficult part of drywall work is often not applying the mud. It is getting the finished surface flat and smooth enough that the repair does not stand out after paint is applied.
That preparation matters because paint can make imperfections more visible under certain lighting conditions. For homeowners preparing a repaired room for painting, Pro A&M Painting can also help with the finishing and painting side of the project once the drywall surface is ready.
Conclusion
The answer to how long does it take for drywall compound to dry is usually around 24 hours for a typical thin coat of premixed joint compound, while setting type products can harden much faster. But the number on the clock is only part of the equation.
Compound thickness, temperature, humidity, ventilation and product formulation all affect the result. Before moving forward, look at the repair itself. The compound should be uniformly dry, firm and ready to produce dry sanding dust. Give thick or questionable areas additional time rather than sanding or painting over material that is still damp.
For drywall repair and painting work that requires a finished surface to look consistent under normal room lighting, proper drying and preparation are just as important as the final coat of paint. Pro A&M Painting provides residential and commercial painting services, including work that depends on properly prepared drywall surfaces.