Your Home Deserves a Painter You Can Trust
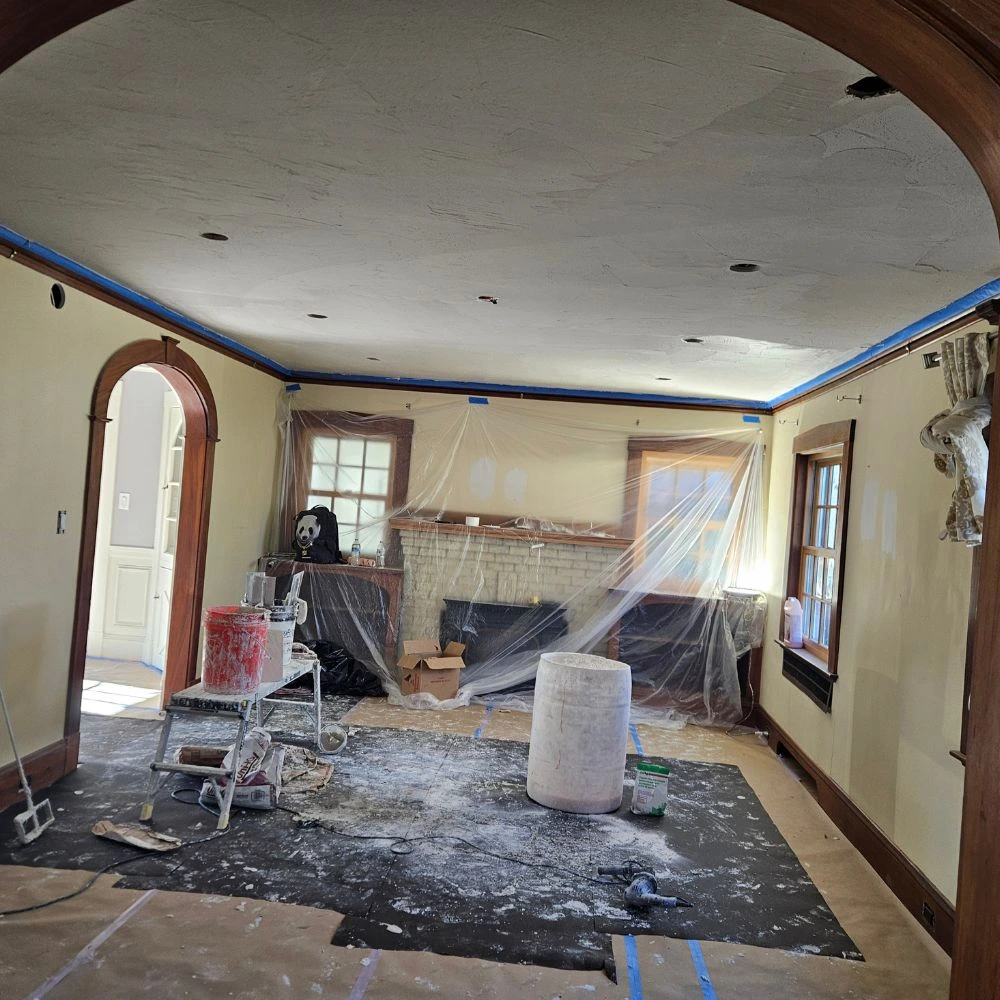
Fresh drywall should almost always be primed before painting. For most interior walls and ceilings, a quality PVA primer is the right choice because it seals the porous surface, reduces paint absorption and helps the finish coat look smoother and more even. The right primer also improves paint adhesion and can save you from using extra coats of paint later.
Painting new drywall may seem straightforward, but the primer you choose has a bigger impact than many homeowners realize. Drywall consists of paper facing and drywall mud, and each absorbs paint differently. Without a primer, these surfaces soak up paint unevenly, leaving dull spots, flashing and inconsistent color that become even more noticeable after the finish coat dries.
Many first time painters spend extra money on premium paint, assuming it will hide imperfections on its own. In reality, even high quality paint performs better over a properly primed surface. A dedicated drywall primer creates a consistent base so your finish paint can deliver the color, sheen and durability it was made to provide.
This blog explains how different primers work, when each type makes sense and what professional painters look for before opening the first gallon.
TL;DR
- A PVA primer is usually the best primer for new drywall.
- Primer seals porous drywall paper and drywall mud.
- Skipping primer often causes uneven color, flashing and poor paint coverage.
- Latex and acrylic primers work well in many situations, especially for previously painted or lightly repaired walls.
- Oil based primers are mainly used when stain blocking or odor sealing is needed.
- Proper sanding and dust removal are just as important as choosing the right primer.
- Most drywall primer covers about 250 to 400 square feet per gallon, depending on the product and surface texture.
- Allow primer to dry according to the manufacturer’s instructions before applying paint.
Why Does New Drywall Need Primer?
Many homeowners ask why they can’t simply paint directly over fresh drywall. The answer comes down to how drywall is made.
A new drywall surface is not uniform. The face paper absorbs paint differently than the drywall mud covering joints, fasteners and repairs. These materials have different porosity levels, so paint dries unevenly when applied without a primer.
Professional painters expect this difference on every new construction project. Before any finish coat goes on, the goal is to create one consistent surface that absorbs paint at the same rate from corner to corner. Primer accomplishes several important jobs:
- Seals porous drywall paper.
- Reduces paint absorption.
- Improves paint adhesion.
- Creates a uniform surface for finish coats.
- Helps paint color appear more consistent.
- Reduces the number of finish coats needed.
Without that sealed foundation, even expensive paint struggles to produce an even finish.
How Drywall Absorbs Paint
Fresh drywall acts almost like a sponge. The paper facing quickly absorbs moisture from paint, while drywall mud often absorbs it at a different rate. As paint dries, these differences become visible through variations in color and sheen.
This is why new walls sometimes look blotchy after the first coat. The issue isn’t necessarily the paint itself. The surface underneath is pulling moisture out of the paint unevenly.
A quality drywall primer fills many of the tiny pores in the surface before the finish coat is applied. Once sealed, paint stays on the surface longer, allowing it to level properly instead of soaking in immediately.
Experienced painters often inspect walls from several angles under bright lighting after priming. If sanding marks, ridges or joint imperfections become visible, they can still be corrected before the finish paint goes on.
What Happens If You Skip Primer?
Skipping primer may save a little time today, but it often creates more work later. One mistake we frequently see is homeowners trying to fix uneven coverage by applying additional coats of paint. While extra paint can improve the appearance, it rarely solves the underlying absorption problem.
Painting directly over new drywall can lead to:
- Uneven paint sheen.
- Flashing between drywall paper and joint compound.
- Poor paint adhesion.
- Higher paint consumption.
- Inconsistent color.
- Visible patchwork after drying.
- Difficulty touching up walls later.
Flashing is especially common on smooth walls painted with eggshell, satin or semi gloss finishes. Under natural light, repaired areas reflect light differently than surrounding drywall because they absorb paint differently. Using primer first creates a much more consistent appearance across the entire wall.
Book Your Free Estimate Today!
Ready to transform your space? Our team is here to help you get started with a no-obligation, on-site estimate. Whether it’s a quick refresh or a full makeover, we’ll guide you every step of the way.
Understanding Different Types of Drywall Primer
Not every primer is intended for the same job. Choosing the right one depends on the condition of the drywall, the room and the type of finish you’re applying.
1. PVA Primer
PVA stands for polyvinyl acetate, a material specifically formulated for sealing new drywall.
This is the primer professional painters reach for most often on freshly installed drywall because it penetrates porous surfaces without adding unnecessary thickness.
Its main advantages include:
- Excellent sealing ability.
- Even paint absorption.
- Good coverage.
- Lower cost than many specialty primers.
- Easy cleanup with water.
PVA primer is intended for clean, new drywall. It is not the right product for blocking stains, smoke damage or water marks.
2. Latex Primer
Latex primer is more versatile than PVA and works on a wider range of interior surfaces. It bonds well to drywall, wood, masonry and previously painted walls, making it a good choice when a room includes several different materials.
Many homeowners choose latex primer when repainting rooms that include patched drywall alongside existing painted walls.
Advantages include:
- Good adhesion.
- Fast drying.
- Low odor.
- Easy cleanup.
- Suitable for many interior painting projects.
While latex primer works on new drywall, many professionals still prefer PVA primer for large areas of fresh drywall because it is specifically formulated for that application.
3. Acrylic Primer
Acrylic primer offers excellent adhesion and flexibility. It performs well where durability is important or where slight movement in building materials may occur due to seasonal temperature and humidity changes.
Some premium acrylic primers can serve as both a bonding primer and a high quality sealer, making them popular for renovation projects that involve multiple surface types.
Acrylic primer is commonly used for:
- Interior walls.
- Ceilings.
- Trim.
- Previously painted drywall.
- Mixed material surfaces.
Although acrylic primers usually cost more than PVA primers, they provide added versatility in remodeling projects.
4. Oil Based Primer
Oil based primers have become less common for standard drywall because modern water based primers perform very well on clean interior surfaces. However, oil based products still have an important role when special conditions exist.
Professional painters typically reserve them for:
- Heavy water stains.
- Smoke damage.
- Nicotine stains.
- Wood tannin bleed.
- Persistent odors.
Oil based primers require mineral spirits for cleanup and generally produce stronger fumes than water based alternatives. They also need longer drying times before applying the finish coat.
For ordinary new drywall, they usually provide little benefit over a quality PVA primer.
Is Most Expensive Primer Always the Right Choice?
Many homeowners assume a premium priced primer will automatically produce better results. In practice, matching the primer to the surface matters more than buying the highest priced product.
For clean, freshly installed drywall, a quality PVA primer often outperforms more expensive specialty products because it was formulated specifically for porous drywall. Spending extra on an oil based stain blocking primer offers little advantage if there are no stains to seal.
Professional painters select primers based on the condition of the wall, not simply the price tag. The right product creates an even foundation that allows the finish paint to perform as intended.
Book Your Free Estimate Today!
Ready to transform your space? Our team is here to help you get started with a no-obligation, on-site estimate. Whether it’s a quick refresh or a full makeover, we’ll guide you every step of the way.
Choosing Right Primer for Different Drywall
Fresh drywall is the most common reason to use primer, but every room has its own conditions. Moisture, repairs, texture and even the paint color can affect which primer performs best.
Instead of using the same product throughout the house, professional painters often choose primers based on the surface they’re working with. That approach helps prevent problems that may not appear until weeks or months after the project is finished.
1. Primer for Patched Drywall
Repairing nail holes, dents or larger sections of drywall creates areas that absorb paint differently from the surrounding wall.
Joint compound is much more porous than cured paint. If you paint directly over the repair, the patched area often appears dull or lighter than the rest of the wall. This effect is commonly called flashing.
For small repairs, spot priming is usually enough before repainting the wall. For larger repairs involving new drywall or extensive skim coating, it’s often better to prime the entire wall. This creates a uniform surface and helps the finish coat dry evenly.
A simple way to test a repair is to wipe your hand across it after sanding. If fine drywall dust still transfers to your fingers, more cleaning is needed before priming.
2. Primer for Skim Coated Walls
A skim coat leaves a thin layer of drywall compound over the entire surface. While it creates a smoother wall, it also increases the amount of porous material that must be sealed. Professional painters almost always apply a full coat of primer after skim coating.
Without it, the finish paint may dry unevenly, requiring additional coats to achieve consistent color and sheen.
3. Primer for Textured Drywall
Textured walls and ceilings absorb primer differently than smooth drywall. Knockdown, orange peel and hand troweled textures create thousands of small peaks and valleys. These irregular surfaces require more primer to achieve complete coverage.
When priming textured drywall:
- Use a roller with the correct nap length.
- Apply enough primer to reach low spots without causing drips.
- Work in manageable sections to maintain even coverage.
- Check the surface from different angles after it dries.
One common DIY mistake is using a roller cover that’s too short. It may glide over the high points while leaving tiny unsealed areas throughout the texture.
4. Primer for Bathroom Drywall
Bathrooms expose painted surfaces to frequent humidity, even with a properly functioning exhaust fan. For standard bathroom walls that are clean and free of water damage, a quality acrylic or moisture resistant latex primer is usually a better choice than a basic PVA primer. These products provide improved adhesion beneath moisture resistant interior paint.
If the drywall has existing water stains from a past leak, address the source of the moisture first. After the area is completely dry, use a stain blocking primer before repainting. Primer alone cannot solve an active moisture problem.
5. Primer for Kitchen Walls
Kitchen walls experience grease, cooking residue and occasional food splatter. New kitchen drywall still benefits from a drywall primer before painting, but remodeling projects often include patched areas next to previously painted surfaces.
In these situations, a high quality acrylic or latex primer offers better versatility because it bonds well to both fresh drywall and existing paint.
Clean all surfaces thoroughly before priming. Even a thin layer of cooking grease can interfere with adhesion.
6. Primer for Ceilings
Ceilings are often overlooked because they’re less likely to be touched, but they deserve the same preparation as walls. Fresh ceiling drywall should be primed before applying ceiling paint.
Because ceilings receive light differently throughout the day, uneven absorption becomes especially noticeable near windows or recessed lighting.
Professional painters usually maintain a wet edge while rolling ceilings to reduce lap marks and create a more uniform finish.
Does Paint Color Affect Primer Choice?
Many homeowners ask if they need a different primer before painting dark colors or bright white walls. The answer depends more on the finish coat than the drywall itself.
Before Dark Paint
Deep blues, charcoal grays, forest greens and other rich colors often require multiple finish coats. Some primers can be tinted closer to the final paint color. This helps reduce the number of finish coats needed while improving color consistency. A tinted primer should complement the finish color rather than match it exactly.
Before White Paint
White paint reveals surface imperfections more easily than many darker colors. Any sanding scratches, raised drywall seams or uneven repairs that remain after priming may become visible once the finish paint dries. After the primer dries, inspect the wall under bright lighting before moving on to the finish coat.
Many experienced painters spend extra time at this stage because correcting flaws is much easier before the final paint is applied.
Book Your Free Estimate Today!
Ready to transform your space? Our team is here to help you get started with a no-obligation, on-site estimate. Whether it’s a quick refresh or a full makeover, we’ll guide you every step of the way.
How Professional Painters Prepare Drywall Before Priming
Primer performs only as well as the surface beneath it. When we inspect drywall before painting, the preparation usually determines how the finished project will look.
Professional painters typically follow these steps:
- Inspect all joints, corners and fastener locations.
- Sand rough drywall compound until smooth.
- Remove loose paper fibers if present.
- Vacuum or brush away heavy drywall dust.
- Wipe remaining dust with a microfiber cloth or damp sponge if recommended by the primer manufacturer.
- Allow the surface to dry completely.
- Protect floors, trim, windows and fixtures.
- Prime the drywall using consistent application techniques.
Skipping even one of these steps can affect the appearance of the finished paint.
Don’t Ignore Drywall Dust
Drywall dust is one of the biggest causes of primer failure. Even if the wall appears clean, a fine layer of powder may remain after sanding.
Instead of bonding directly to the drywall, the primer bonds to the dust. As a result, adhesion is weaker and the finish may not perform as expected. A quick inspection with a flashlight held at a low angle often reveals dust that isn’t visible under normal room lighting.
How Many Coats of Primer Are Needed?
For most new drywall, one full coat of primer is sufficient. The goal is complete, even coverage across the surface.
A second coat may be helpful if:
- The drywall is unusually porous.
- Heavy skim coating was applied.
- The first coat appears uneven.
- The manufacturer recommends a second coat.
- You’re making a significant color change.
Applying extra primer simply because some remains in the can usually doesn’t improve the final result. Uniform coverage matters more than the total number of coats.
Primer Drying Times
Drying time depends on temperature, humidity, air movement and the specific product.
Most water based drywall primers become dry to the touch within 30 minutes to 1 hour.
Many can be recoated after 2 to 4 hours, although some premium products require additional drying time. Oil based primers generally take longer before they are ready for paint.
Avoid rushing this step. If finish paint is applied before the primer has cured sufficiently, it may affect adhesion or leave an uneven appearance. Always follow the drying recommendations printed on the product label.
How Much Primer Do You Need?
Coverage varies by product and by the condition of the drywall. Smooth new drywall generally allows better coverage than rough or heavily textured surfaces.
Typical coverage ranges are:
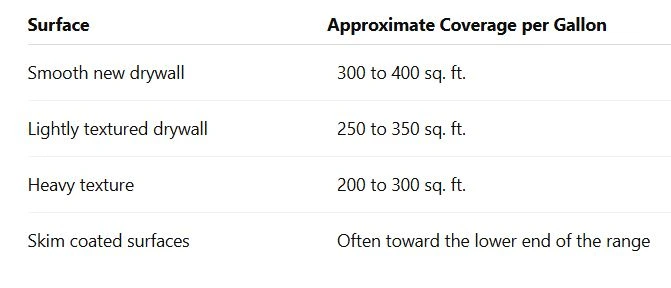
Buying a little extra primer is often cheaper than stopping the project to purchase another gallon halfway through.
Typical Primer Costs
Primer prices vary by quality, brand, and formulation.
As a general guideline:
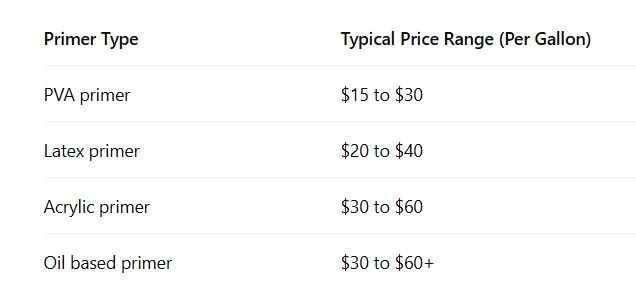
Higher priced primers are worthwhile when their specific properties match the project. For standard new drywall, an economical PVA primer is often the most practical option.
Book Your Free Estimate Today!
Ready to transform your space? Our team is here to help you get started with a no-obligation, on-site estimate. Whether it’s a quick refresh or a full makeover, we’ll guide you every step of the way.
Roller or Sprayer: Which Applies Primer Better?
Both methods can produce excellent results when used correctly.
Using a Roller
A roller remains the preferred choice for many homeowners because it is simple to control and wastes very little material.
Rollers are especially effective in occupied homes where masking every surface for spraying would take more time than rolling.
For smooth drywall, a 3/8-inch nap roller usually provides even coverage. For textured drywall, a 1/2-inch to 3/4-inch nap is often a better choice.
Using an Airless Sprayer
Professional painting crews frequently use airless sprayers on new construction because they can cover large areas quickly.
However, spraying requires extensive masking to protect floors, windows, trim, cabinets and fixtures from overspray. Many contractors spray the primer first and then back roll it immediately. This technique helps work the primer into the drywall surface while creating a more uniform finish.
Homeowners who want professional looking results but prefer to avoid the learning curve often hire experienced companies such as Pro A&M Painting to handle surface preparation and priming before the finish coats are applied.
Professional Tips for Better Results
Experienced painters rely on consistent habits that improve both appearance and durability.
- Stir primer thoroughly before each use.
- Box multiple gallons together to maintain consistent color and viscosity.
- Prime the entire wall instead of spot priming when repairs are extensive.
- Maintain a wet edge to reduce lap marks.
- Allow recommended drying time before painting.
- Replace heavily worn roller covers during large projects.
- Check walls under bright side lighting before applying the finish coat.
- Keep room temperatures within the manufacturer’s recommended range while primer cures.
These small details rarely add much time to the project, but they often make the difference between an average looking paint job and one that looks smooth and consistent for years.
How to Prime New Drywall Like a Professional
A quality primer can only do its job if it’s applied correctly. Taking a little extra time during preparation usually produces a smoother finish and reduces the amount of touch up work after painting.
Step 1: Inspect the Drywall
Walk around the room before opening the primer. Look for:
- Raised drywall screws.
- Rough joint compound.
- Nail pops.
- Small dents.
- Sanding scratches.
- Loose drywall tape.
- Damaged paper facing.
Use a bright work light or flashlight held at an angle. Small imperfections often become much easier to see with side lighting.
Step 2: Finish Sanding
Lightly sand joints and patched areas until they feel smooth to the touch. Avoid oversanding. Aggressive sanding can damage the paper surface of the drywall, creating fuzzy fibers that are harder to hide with primer and paint. If you accidentally expose the gypsum core, repair the area before moving forward.
Step 3: Remove Dust Completely
After sanding, clean the walls thoroughly. A typical cleaning routine includes:
- Vacuuming the walls with a soft brush attachment.
- Brushing dust from corners and trim.
- Wiping remaining residue with a microfiber cloth or slightly damp sponge if appropriate.
The wall should feel clean when you run your hand across it.
Step 4: Protect the Room
Cover surfaces that should not receive primer.
Protect:
- Floors.
- Baseboards.
- Windows.
- Doors.
- Light fixtures.
- Electrical outlets.
- Cabinets.
- Countertops.
Taking time to mask properly usually saves much more time during cleanup.
Step 5: Cut In the Edges
Use a quality angled brush to prime areas the roller cannot easily reach.
These include:
- Corners.
- Ceiling lines.
- Around windows.
- Around doors.
- Behind pipes.
- Around electrical boxes.
Try to keep the cut in areas consistent with the roller application so the surface dries evenly.
Step 6: Roll the Main Surface
Load the roller evenly without overfilling it. Work in sections approximately three to four feet wide. Roll in overlapping passes to maintain a wet edge and avoid missed areas. Don’t press the roller hard against the wall. Let the roller cover carry the primer onto the surface.
Step 7: Check Coverage
After the primer dries, inspect every wall under good lighting.
Look for:
- Missed spots.
- Roller lines.
- Dry areas.
- Heavy buildup.
- Drips.
- Rough patches.
Lightly sand any raised fibers or dried drips before applying paint.
Step 8: Apply the Finish Paint
Once the primer has dried according to the manufacturer’s instructions, the wall is ready for the finish coat.
The paint should spread more evenly, cover better and develop a more consistent sheen than it would over bare drywall.
Book Your Free Estimate Today!
Ready to transform your space? Our team is here to help you get started with a no-obligation, on-site estimate. Whether it’s a quick refresh or a full makeover, we’ll guide you every step of the way.
Common DIY Mistakes to Avoid
Many painting problems begin long before the finish coat. Here are some of the most common mistakes professionals encounter.
1. Using Paint Instead of Primer
Paint and primer serve different purposes. Even products labeled as “paint and primer in one” are generally intended for previously painted surfaces. They are not a substitute for a dedicated drywall primer on fresh drywall.
2. Priming Before the Drywall Compound Has Fully Dried
Joint compound should be completely dry before sanding and priming. Priming damp compound can trap moisture, which may affect adhesion and create an uneven finish.
3. Leaving Sanding Dust Behind
Drywall dust is extremely fine and easy to overlook. If primer is applied over dust, the coating bonds to the dust instead of the drywall.
4. Choosing the Wrong Roller Cover
A roller with too little nap may leave textured surfaces partially unsealed. A roller with excessive nap on smooth drywall can leave unnecessary texture. Match the roller cover to the wall surface for the most even finish.
5. Applying Primer Too Thin
Trying to stretch a gallon farther than recommended often leaves areas only partially sealed. Complete, uniform coverage is more important than using the least amount of product.
6. Painting Too Soon
Even if primer feels dry to the touch, it may still need additional time before it can be painted. Following the recommended recoat time helps improve adhesion and finish quality.
Professional Recommendations
Experienced painters rely on a few practical habits that consistently improve results.
1. Buy Enough Material Before Starting
Running out of primer halfway through a room can interrupt drying times and create unnecessary delays. Calculate square footage before shopping and purchase a little extra for unexpected touch ups.
2. Keep Room Conditions Stable
Interior temperatures between approximately 60°F and 80°F generally provide good conditions for water based primers. High humidity or poor ventilation can slow drying.
3. Stir Primer Periodically
Pigments and solids naturally settle in the can. Stir the primer thoroughly before starting and occasionally during the project to maintain a consistent mixture.
4. Use Good Lighting
Natural daylight doesn’t always reveal every surface defect. Temporary work lights or bright LED lights help identify sanding marks, ridges and missed areas before the finish paint is applied.
5. Don’t Rush Surface Repairs
Professional looking paint starts with professional looking drywall. Primer improves the surface, but it cannot hide poorly finished joints or significant wall imperfections.
Conclusion
Choosing the best primer for new drywall is less about buying the most expensive product and more about matching the primer to the surface you’re painting.
For most fresh drywall, a quality PVA primer provides the sealing needed for even paint absorption, strong adhesion and a smoother looking finish. Acrylic and latex primers become valuable when working with repaired walls, mixed surfaces or areas exposed to higher humidity. Oil based primers remain a practical solution for stain blocking rather than everyday drywall preparation.
Just as important as the primer itself is the work that comes before it. Careful sanding, thorough dust removal, proper drying time and complete coverage all contribute to a finish that looks consistent under every lighting condition.
Whether you’re painting a single bedroom or finishing an entire home, taking the time to prime new drywall correctly helps the finish coat perform the way it was intended. The result is better coverage, a more uniform sheen and a paint job that’s more likely to look good for years to come.