Your Home Deserves a Painter You Can Trust
How long does caulk take to dry? Most caulk becomes dry to the touch within a few hours, but the time needed before painting, exposing it to water or considering it fully cured depends heavily on the product. Some caulks can be painted relatively soon after application, while others need substantially more time to cure.
The label on the specific product is the final authority. Temperature, humidity, ventilation, bead thickness, the type of caulk and the surface underneath can all change the drying process.
One important distinction comes first: dry does not necessarily mean cured. A caulk bead may develop a skin on the outside while the material underneath is still soft. Painting or exposing it to moisture too early can interfere with the finished result.
TL;DR
- Drying time: Many common caulks become dry to the touch within a few hours, but exact times vary by formulation.
- Curing time: Full cure can take considerably longer than surface drying.
- Paintability: Only paint caulk when the product manufacturer says it is ready for painting.
- Humidity: Moisture sensitive caulks may cure differently depending on environmental conditions.
- Temperature: Cold conditions generally slow curing.
- Thickness: A thick bead takes longer to dry and cure than a thin, properly applied bead.
- Product type matters: Acrylic latex, silicone, polyurethane and hybrid sealants do not necessarily behave the same way.
- When in doubt: Follow the product label and technical data sheet rather than relying on a generic drying time estimate.
What Is the Difference Between Drying and Curing?
The terms drying and curing are often used interchangeably, but they describe different stages. Drying generally refers to the point when the surface of the caulk has lost enough moisture or solvent to form a skin and no longer feels wet.
Curing refers to the broader process in which the material develops its intended physical properties throughout the bead. Depending on the formulation, curing may involve evaporation, exposure to moisture in the air or a chemical reaction.
That distinction matters because caulk can feel dry while the material underneath remains soft. For example, pressing a recently applied bead may leave a mark even though the surface no longer feels wet. If you paint, clean or expose the area to water before the manufacturer says the material is ready, you may damage the bead or interfere with adhesion and appearance.
For a painting project, the relevant question is not simply “Is the caulk dry?” It is “Has this particular caulk reached the stage required for the next step?”
How Long Does Caulk Take to Dry?
There is no single drying time that applies to every caulk. A common interior acrylic latex caulk may become dry to the touch within a few hours under suitable conditions. Some fast drying products are formulated to become paintable sooner, while other sealants require significantly more time.
Silicone and polyurethane products can have different curing characteristics. Some are moisture cured, meaning the surrounding moisture in the air plays a role in the curing process. Hybrid products can have their own manufacturer specific instructions.
A useful way to think about the timeline is:
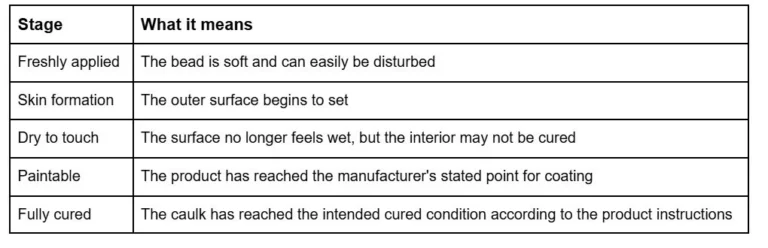
These stages are not interchangeable. If you’re preparing trim for painting, for example, paintability is more important than simply knowing when the caulk feels dry.
What Affects Caulk Drying and Curing Time?
The same product can behave differently under different conditions. Several factors deserve attention before you put a finish coat over newly applied caulk.
1. Type of Caulk
The formulation is one of the biggest factors.
- Acrylic latex caulk is commonly used around interior trim, baseboards, door frames and other areas that need to be painted. Many paintable acrylic products are designed with painting in mind, but their stated drying and painting times still vary.
- Silicone caulk is commonly selected where flexibility and water resistance are important. Many silicone products are not intended to be painted, so checking the label is particularly important before applying paint.
- Polyurethane sealants can provide strong adhesion and durability but may have different curing requirements from typical interior painter’s caulk.
- Hybrid sealants combine characteristics from different formulations. Their performance and paintability depend on the specific product.
Do not assume that because one tube of caulk can be painted after a certain period, every caulk can be treated the same way.
2. Temperature
Temperature can have a major effect on curing. Caulk generally performs according to the environmental conditions specified by its manufacturer. Applying a product in conditions outside those recommendations can slow curing or affect the final result.
Cold surfaces and cold rooms can make the process take longer. This is especially relevant during cooler weather when an exterior application may not reach suitable temperatures for the product to cure properly. Always check the product’s application temperature range rather than relying on a general rule.
3. Humidity
Humidity can affect caulk differently depending on the formulation. Some moisture cured sealants rely on moisture from the surrounding air as part of the curing process. Other products may behave differently because their drying mechanism depends more heavily on evaporation.
High humidity can also slow the evaporation of water from some water based products. That means “more humidity always makes caulk cure faster” is not a reliable rule. The chemistry of the product matters.
4. Ventilation
Good air movement can help certain water based products release moisture and dry more efficiently. That does not mean you should use excessive airflow to force the process. The goal is appropriate ventilation under the manufacturer’s recommended conditions.
Opening doors or windows may help in some interior situations, provided doing so does not introduce unsuitable temperature, humidity, dust or outdoor conditions.
5. Thickness of the Bead
A thick bead generally takes longer to dry and cure through than a thin bead. This is one reason proper application matters. If a joint requires a large amount of material, simply applying a heavy bead and expecting it to cure at the same rate as a thin bead can lead to problems.
Excess material may remain soft beneath the surface after the outside has already skinned over.
6. Surface Condition
Caulk needs a suitable surface to adhere to. Dust, loose paint, grease, moisture, deteriorated material and other contaminants can interfere with adhesion. A caulk bead that does not bond properly may fail even if it appears dry.
Surface preparation is therefore part of the process, not something to worry about after the caulk has been applied.
Book Your Free Estimate Today!
Ready to transform your space? Our team is here to help you get started with a no-obligation, on-site estimate. Whether it’s a quick refresh or a full makeover, we’ll guide you every step of the way.
When Can You Paint Over Caulk?
The answer is simple: paint caulk only after the specific product says it is paintable. The manufacturer’s stated paintability time takes precedence over a generic estimate found online.
For common paintable interior caulks, the required wait may be relatively short under proper conditions. However, the exact time can change with the product and environment. Before painting, check:
- The caulk’s product label.
- The manufacturer’s technical data sheet if available.
- The recommended application temperature.
- The stated paintability or overcoating time.
- Whether the product is actually designed to accept paint.
Do not assume that a caulk that feels dry is automatically ready for paint.
Why Paintability Matters
Paint applied too early may not behave properly as the caulk continues to dry or cure. Depending on the product and conditions, premature painting can contribute to:
- Cracking.
- Poor adhesion.
- Surface distortion.
- Uneven sheen.
- Soft or tacky areas.
- Visible separation at the joint.
- Premature failure of the finish.
The exact problem depends on the caulk, paint, environmental conditions and application. If the product label gives a specific paintability window, follow it.
What Happens If You Paint Caulk Too Soon?
Painting too soon can cause problems because the caulk underneath the paint is still changing. As a bead continues to dry or cure, it may shrink slightly or change its physical properties. If a rigid coating is applied before the sealant is ready, the paint film may not move with the underlying material.
The result can be cracking along the joint or a visible line where the caulk meets the painted surface. Another problem is trapped moisture. A surface that looks ready from the outside may still contain moisture underneath. Covering it before the recommended time can slow the process further.
There is also a practical issue: fresh caulk is easier to damage. Sanding, brushing, rolling, cleaning or masking around it before it has sufficiently set can pull or deform the bead. Waiting for the correct stage is usually easier than trying to repair a damaged joint later.
How Can You Tell If Caulk Is Ready?
Visual appearance alone is not enough. A better approach is to combine the product instructions with the condition of the bead. Depending on the product, signs that the surface has sufficiently set may include:
- The manufacturer’s stated drying or paintability time has passed.
- The surface no longer feels wet or tacky.
- The bead maintains its shape when lightly touched.
- There is no obvious movement or deformation from gentle contact.
- Environmental conditions have remained within the product’s recommended range.
Avoid repeatedly pressing the bead to test it. Doing so can damage a partially cured joint. If you’re unsure, waiting longer is generally preferable to disturbing the material prematurely, provided the product’s instructions do not specify a different procedure.
Book Your Free Estimate Today!
Ready to transform your space? Our team is here to help you get started with a no-obligation, on-site estimate. Whether it’s a quick refresh or a full makeover, we’ll guide you every step of the way.
Common Caulking Mistakes That Cause Problems
Many caulking failures have nothing to do with the quality of the tube itself. The preparation and application can make just as much difference.
1. Applying Caulk to a Dirty Surface
Dust, grease, loose paint and deteriorated material can prevent proper adhesion. The surface should be clean, sound and appropriate for the product being used.
2. Applying Too Much Caulk
A larger bead is not automatically better. Excess material can take longer to cure and may be difficult to tool cleanly. Use enough material to fill the joint without creating an unnecessarily large bead.
3. Painting Before the Product Is Paintable
This is one of the easiest mistakes to make because the outer surface may appear dry. Check the product instructions rather than relying on touch alone.
4. Using the Wrong Type of Caulk
Not every sealant is designed for the same job. A product selected for a wet area may not be appropriate for a paintable interior trim joint. Conversely, a paintable interior caulk may not be the right choice for a joint requiring a particular level of water resistance or movement capability.
5. Ignoring the Substrate
Different materials move differently as temperatures and moisture levels change. A sealant needs to be compatible with the surfaces being joined and the movement expected at the joint.
6. Applying Caulk Under Poor Conditions
Extreme temperatures, excessive moisture or unsuitable surface conditions can affect application and curing. If the product specifies environmental limits, those requirements matter.
Caulk vs. Spackle: They Are Not the Same Thing
Homeowners sometimes use caulk and spackle interchangeably because both can be used to make surfaces look smoother before painting. They serve different purposes.
Caulk is primarily used to seal joints and gaps, particularly where some movement may occur.
Spackle is generally used to fill small holes, dents and surface imperfections in materials such as drywall.
For example, the joint between a baseboard and wall may call for an appropriate caulk, while a small nail hole in drywall may be better addressed with a suitable patching compound.
Choosing the right material is important because the finished surface needs to accommodate the type of movement and repair involved.
Book Your Free Estimate Today!
Ready to transform your space? Our team is here to help you get started with a no-obligation, on-site estimate. Whether it’s a quick refresh or a full makeover, we’ll guide you every step of the way.
Does Caulk Need to Be Cured Before Painting?
Not necessarily in every case. Some products are specifically designed to be painted after reaching a stated paintability stage that occurs before full cure. Others may require a longer period before they should receive a coating.
This is why using fully cured as the only rule can be misleading. The correct question is whether the manufacturer has approved the product for painting at that point in the curing process.
If the label says the product is paintable after a certain period under specified conditions, that instruction is more useful than applying a universal cure time rule.
Does More Caulk Take Longer to Dry?
Generally, yes. A thicker application gives moisture, solvent or other components more material to move through during the drying or curing process.
However, the exact relationship depends on the product’s chemistry. Some sealants cure through mechanisms that do not behave like simple evaporation.
The practical takeaway is straightforward: avoid assuming that a thick bead will dry at the same rate as a thin bead.
If a joint is unusually deep or wide, the product may have specific requirements for application depth, backing material, or curing conditions.
Can You Speed Up Caulk Drying?
You should not try to force the process beyond the conditions recommended by the manufacturer. Improving ordinary ventilation may help an appropriate water based product dry under suitable conditions, but aggressive heat or unsuitable environmental changes can cause problems.
For example, using intense heat directly on a fresh bead is not a substitute for following the product’s instructions. A better approach is to:
- Apply the product within the recommended temperature range.
- Keep the area appropriately ventilated.
- Avoid unnecessary moisture exposure.
- Apply the correct amount of material.
- Allow the manufacturer’s recommended time.
- Avoid painting or disturbing the bead prematurely.
Proper application usually saves more time than trying to rescue a poorly cured joint.
Book Your Free Estimate Today!
Ready to transform your space? Our team is here to help you get started with a no-obligation, on-site estimate. Whether it’s a quick refresh or a full makeover, we’ll guide you every step of the way.
When Does Caulking Become a Painting Professional's Concern?
Caulking is often part of a larger painting preparation process. If a wall or trim area has widespread cracking, failing old caulk, damaged drywall, moisture staining, deteriorated wood or recurring gaps, simply adding another bead may not solve the underlying problem.
The surface may need to be evaluated before new caulk and paint are applied. For a larger interior or exterior project, Pro A&M Painting can assess the condition of painted surfaces and determine what preparation is needed before coating them.
The important point is that caulk should not be used to hide a problem that requires repair. If a joint keeps opening, the surrounding material is moving or moisture is entering the assembly, the underlying cause needs attention.
Conclusion
So, how long does caulk take to dry? There is no single number that works for every product. For many common interior applications, the surface may become dry within a few hours, but the time required before painting or full curing can be longer. The type of sealant, temperature, humidity, ventilation, bead thickness, substrate and product formulation all matter.
The most reliable process is simple:
- Choose a caulk appropriate for the joint.
- Prepare the surface properly.
- Apply the recommended amount.
- Keep the area within the manufacturer’s recommended conditions.
- Wait for the stated drying or paintability time.
- Do not confuse surface dryness with complete curing.
- Follow the product label or technical data sheet when its instructions differ from general guidance.
For painting projects where caulking is only one part of the preparation, Pro A&M Painting can help determine whether gaps, joints, trim, drywall or other surfaces are ready for the next stage of the painting process.
Taking the extra time to let caulk reach the appropriate stage is a small part of a painting project, but it can prevent avoidable cracking, adhesion problems and visible defects later. When the product instructions are followed and the surface is properly prepared, the paint has a much better foundation for a clean, durable finish.