Your Home Deserves a Painter You Can Trust

TL;DR
How Many Screws Per Sheet of Drywall depends on whether you’re installing drywall on walls or ceilings, the framing spacing and local building code. A standard 4×8 sheet of drywall typically requires 32 screws for walls and 40–48 screws for ceilings when installed on framing spaced 16 inches on center. Proper screw spacing, correct screw length and solid fastening are just as important as the total screw count.
Installing drywall might seem straightforward, but one of the most common questions homeowners and DIYers ask is, How many screws should I use on each sheet? Using too few screws can cause the drywall to sag, crack or separate from the framing. Use too many and you waste time, money and may even weaken the panel by over fastening it.
The right screw pattern creates a secure installation that supports the drywall through years of seasonal movement, vibration and normal household use. It also makes finishing easier because properly fastened drywall stays flatter, reducing the chances of visible seams or popped fasteners after painting.
This blog explains How many screws per sheet of drywall for both walls and ceilings, how screw spacing changes depending on the installation and why professionals follow specific fastening patterns instead of simply guessing. Whether you’re remodeling a single bedroom or finishing an entire basement, understanding these basics can save hours of rework later.
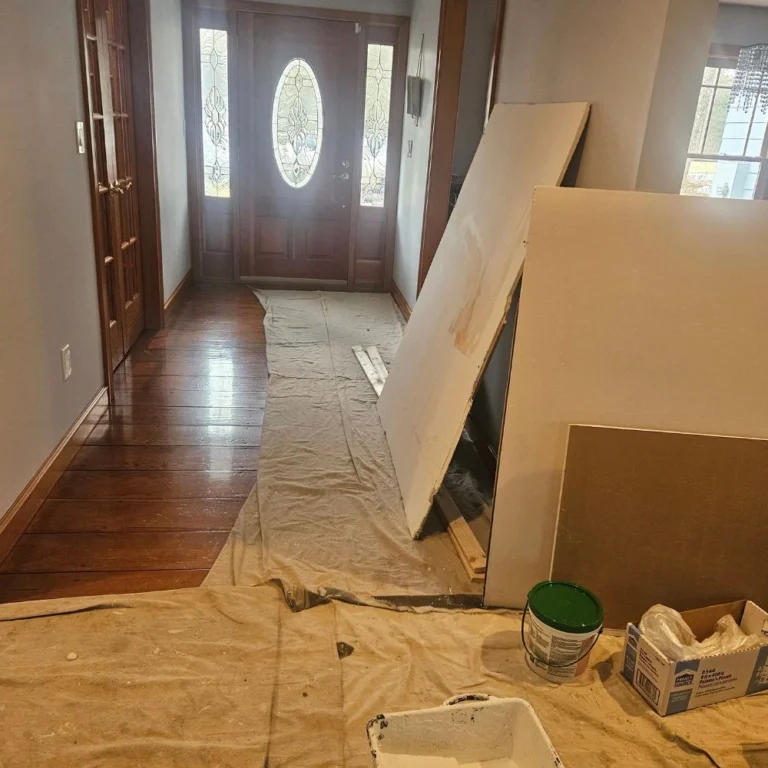
What Is the Standard Number of Screws Per Sheet?
The answer depends on several factors, including:
- Whether the drywall is installed on a wall or ceiling.
- Stud spacing.
- Drywall thickness.
- Local building code requirements.
- Whether construction adhesive is used.
- Whether the framing is wood or metal.
For a standard 4-foot by 8-foot drywall sheet, professionals generally follow these guidelines.
- Wall drywall: About 32 screws
- Ceiling drywall: About 40–48 screws
- High stress ceiling areas: Up to 56 screws if required by plans or code
These recommendations are based on framing spaced 16 inches on center, the standard layout in most residential homes.
Instead of counting screws individually, experienced installers focus on maintaining consistent screw spacing across every framing member. When the spacing is correct, the final screw count naturally falls within accepted construction standards.
This is why asking How Many Screws Per Sheet of Drywall is only part of the equation. The spacing pattern is what truly determines a quality installation.
Why Screw Count Matters
Drywall is heavier than many people realize. A standard 1/2-inch 4×8 sheet of drywall weighs about 50 pounds, while thicker fire rated panels are considerably heavier. Once mounted vertically or overhead, that weight constantly pulls against the fasteners. Too few screws can lead to problems such as:
- Loose drywall panels
- Nail or screw pops
- Cracked drywall joints
- Sagging ceilings
- Movement around doors and windows
- Uneven finished walls
Driving screws every few inches wastes material and increases the chance of breaking the paper face. The paper layer provides much of the drywall’s strength. If it’s torn, that screw loses much of its holding power.
The goal is balanced fastening, not simply installing the highest number of screws possible.
How Screw Count Changes for Walls
Wall installations experience much less downward force than ceilings because gravity acts differently on a vertical surface. That means fewer fasteners are generally required while still creating a secure installation. Most professionals install wall drywall using a screw pattern that provides approximately 32 screws per 4×8 sheet.
Typical Wall Screw Pattern
For walls with framing spaced 16 inches on center:
- Screws every 16 inches along each stud.
- Maintain consistent spacing from top to bottom.
- Fasten every stud behind the sheet.
- Keep screws slightly away from sheet edges.
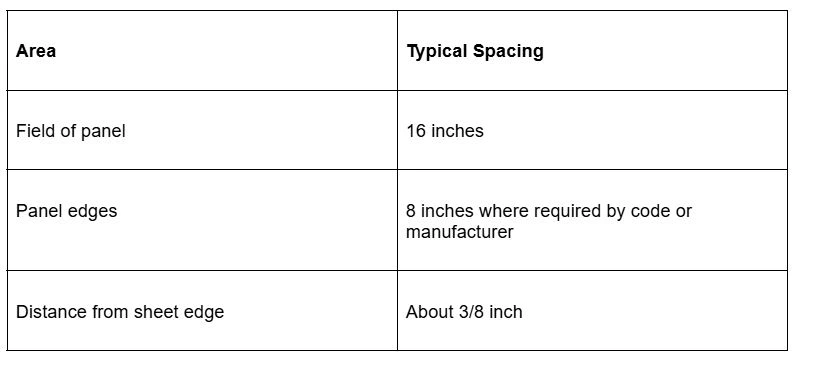
The edges deserve extra attention because they’re where drywall joints meet. Proper fastening keeps the edges tight and reduces movement that can crack joint compound later.
Wall Calculation
Suppose you’re installing one standard sheet on framing spaced 16 inches apart. The sheet crosses five studs.
If each stud receives approximately six to seven screws from top to bottom, your total lands around 30 to 35 screws, with 32 being the commonly accepted average.
Rather than counting every screw while working, many installers develop a consistent rhythm that naturally maintains proper spacing.
Wall Installations Around Doors and Windows
Openings change the fastening pattern. Drywall around windows and doors experiences more movement because framing members intersect at multiple angles. Professionals often:
- Add screws near corners without over fastening.
- Avoid placing screws too close to cutout edges.
- Ensure every supported edge is properly secured.
- Keep screw heads slightly below the paper surface without tearing it.
These adjustments improve durability and help reduce cracking around trim.
Book Your Free Estimate Today!
Ready to transform your space? Our team is here to help you get started with a no-obligation, on-site estimate. Whether it’s a quick refresh or a full makeover, we’ll guide you every step of the way.
How Screw Count Changes for Ceilings
Ceilings place much greater stress on drywall because gravity constantly pulls the panels downward. That’s why ceiling drywall almost always requires:
- More screws.
- Closer spacing.
- Better fastening consistency.
Most professionals install 40 to 48 screws per standard 4×8 ceiling sheet, although exact requirements depend on framing layout and local code.
Why Ceilings Need More Fasteners
Several factors increase the load on ceiling drywall:
- The entire weight hangs overhead.
- Temperature changes cause expansion and contraction.
- Insulation may add pressure.
- Attic humidity can affect framing movement.
- Larger unsupported spans create more stress.
More screws distribute that weight evenly across the framing system.
Typical Ceiling Screw Pattern
For ceilings framed 16 inches on center:
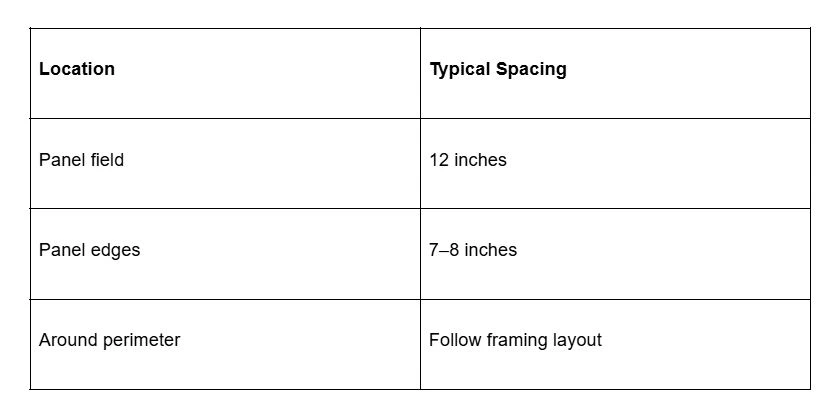
Compared to wall installations, the closer spacing provides additional holding strength against sagging.
Ceiling Panels Installed Perpendicular to Joists
Most professionals install drywall perpendicular to ceiling joists whenever possible. Benefits include:
- Better structural support.
- Stronger finished ceiling.
- Less seam movement.
- Reduced sagging.
- Easier finishing.
This layout also helps distribute fasteners more evenly across multiple framing members.
Recommended Drywall Screw Spacing
Knowing the total screw count helps with estimating materials, but installers rarely work by counting screws. They work by spacing.
Proper drywall screw spacing creates consistent holding power across the entire panel.
General Spacing Guidelines
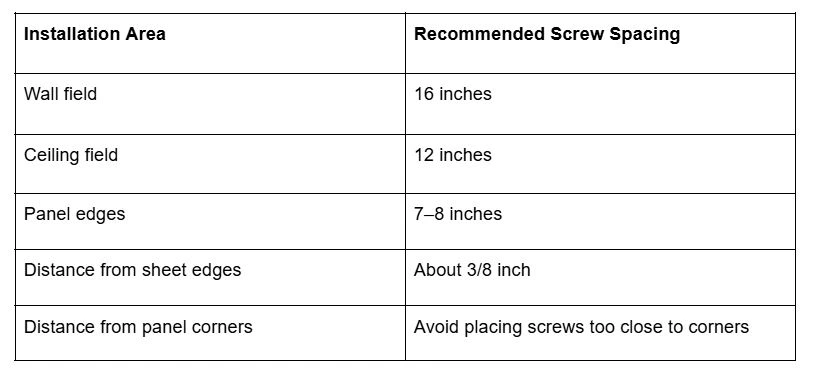
Maintaining these distances helps prevent edge damage while keeping every panel securely attached.
Why Edge Spacing Matters
The edges of drywall panels are the weakest areas because they contain tapered joints that will later be filled with joint compound and tape. If screws are too far apart, those edges can flex over time. If screws are too close together, the paper may tear.
Professional installers aim for even spacing that supports the joint without weakening the drywall itself.
Avoid Overdriving Screws
One of the biggest mistakes beginners make is driving screws too deep. A properly installed drywall screw should:
- Sit slightly below the paper surface.
- Create a small dimple.
- Leave the paper intact.
- Hold the panel firmly against the framing.
If the paper tears, remove that screw and install another nearby. A damaged screw no longer provides its intended holding strength.
This attention to detail is one reason experienced crews, including professionals from Pro A&M Painting when drywall installation is part of a remodeling project, focus on consistent fastening rather than simply using more screws. Proper placement results in stronger walls, smoother finishing and fewer repairs down the road.
Book Your Free Estimate Today!
Ready to transform your space? Our team is here to help you get started with a no-obligation, on-site estimate. Whether it’s a quick refresh or a full makeover, we’ll guide you every step of the way.
Drywall Screw Length Guide
Using the right number of screws is only half the job. Choosing the correct screw length is just as important. A screw that’s too short may not hold the drywall securely, while one that’s too long takes more effort to drive and can interfere with plumbing, wiring or other components hidden inside the wall.
The goal is simple: the screw should penetrate the framing enough to create a solid grip without causing unnecessary damage.
Recommended Drywall Screw Lengths
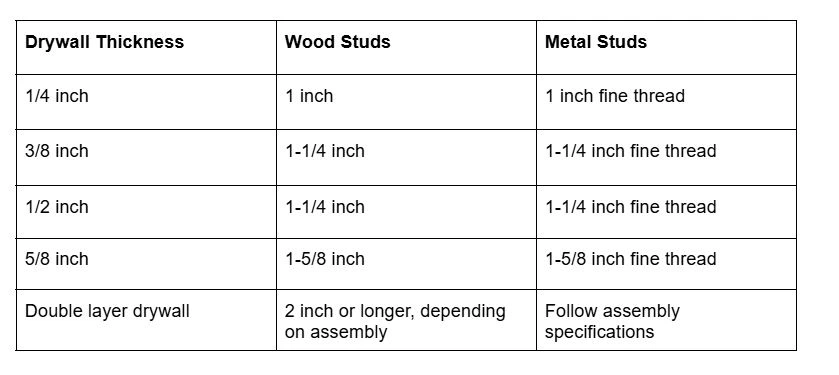
For most residential interior walls with 1/2-inch drywall over wood framing, 1 1/4-inch coarse thread drywall screws are the standard choice.
If you’re installing 5/8-inch drywall, especially on ceilings or garage walls where fire rated assemblies are common, stepping up to 1 5/8-inch screws provides the additional penetration needed.
Coarse Thread vs. Fine Thread
Not every drywall screw is the same. The thread pattern is designed for the type of framing behind the drywall.
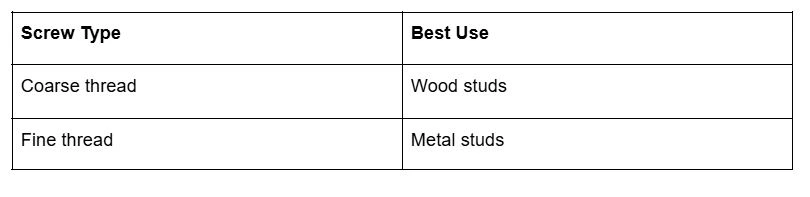
Coarse threads bite aggressively into lumber, giving excellent holding power.
Fine thread screws cut into steel more easily and reduce the chance of stripping the metal stud before the screw seats properly.
Using the wrong screw type often leads to spinning screws that never tighten correctly.
Wood Studs vs. Metal Studs
The framing behind the drywall affects not only the type of screw but also the installation process. Although the answer to How Many Screws Per Sheet of Drywall usually stays similar, installers adjust their technique depending on the framing material.
Installing Drywall on Wood Studs
Wood is the most commonly used framing material in residential construction.
Advantages include:
- Strong screw holding power.
- Easier installation.
- Less chance of stripped fasteners.
- Readily available materials.
- Suitable for most remodeling projects.
When driving screws into wood studs:
- Keep the screw straight.
- Stop once the head forms a slight dimple.
- Avoid burying the screw too deeply.
- Check that the drywall stays tight against the framing.
Wood framing is forgiving, but consistency still matters.
Installing Drywall on Metal Studs
Metal studs are common in commercial buildings, offices, basements, and multifamily construction. Compared to wood, they require a little more patience.
Best practices include:
- Use fine thread drywall screws.
- Apply steady pressure until the screw bites.
- Keep the drill square to the stud.
- Avoid excessive speed that can strip the metal.
Once a screw strips a metal stud, it loses much of its holding strength. If that happens, drive another screw nearby instead of trying to reuse the same hole.
Drywall Code Recommendations
Building codes don’t usually tell installers to use an exact number of screws per sheet. Instead, they specify fastening requirements such as spacing, edge support, and approved installation methods.
Those requirements are based on recognized construction standards and manufacturer installation instructions.
While local codes vary, these practices are commonly accepted for residential drywall installation:
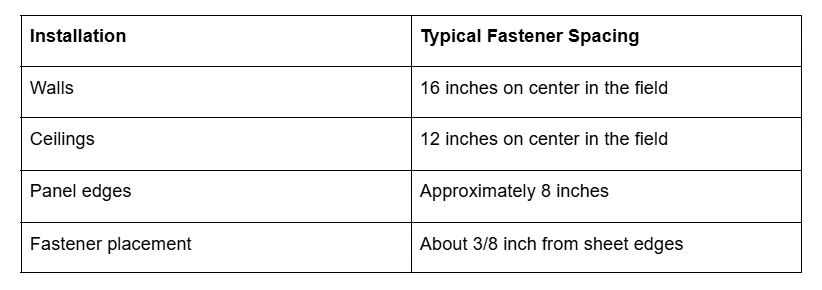
Always check your local building codes before working on:
- New construction.
- Structural remodeling.
- Fire rated assemblies.
- Multifamily housing.
- Commercial buildings.
Inspectors typically look for proper spacing, securely seated fasteners, and panels that are firmly attached to the framing. Simply adding extra screws will not compensate for poor installation techniques.
Book Your Free Estimate Today!
Ready to transform your space? Our team is here to help you get started with a no-obligation, on-site estimate. Whether it’s a quick refresh or a full makeover, we’ll guide you every step of the way.
How to Calculate Screws for an Entire Room
Estimating screws before starting a project helps prevent unnecessary trips to the hardware store.
Step 1: Count the Drywall Sheets
Start by calculating the number of drywall panels needed.
Example:
A bedroom requires:
- 24 wall sheets
- 12 ceiling sheets
Total:
36 drywall sheets
Step 2: Estimate Screws Per Sheet
Use the installation type.
For example:
- Walls: Approximately 32 screws each.
- Ceilings: Approximately 44 screws each.
Calculation:
Walls
24 × 32 = 768 screws
Ceilings
12 × 44 = 528 screws
Total:
1,296 screws
Step 3: Add Extra Screws
Always purchase more than your estimate. Reasons include:
- Damaged screws.
- Missed studs.
- Stripped fasteners.
- Waste during installation.
- Future repairs.
Most professionals add 10% to 15% as a safety margin.
For the example above:
1,296 × 1.10 = approximately 1,426 screws
Buying the next larger box is usually the most practical option.
Quick Estimating Table
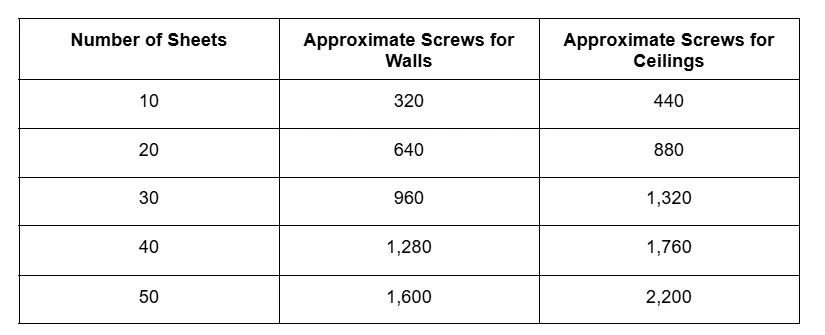
These estimates assume standard fastening patterns on framing spaced 16 inches on center.
Common Drywall Screw Mistakes
Even experienced DIYers occasionally run into problems that make finishing more difficult. Understanding these common mistakes can save time and produce a stronger finished wall.
1. Driving Screws Too Deep
This is the mistake professionals see most often. When the screw tears through the paper, it no longer clamps the drywall effectively. Instead of trying to repair the damaged fastener, install another screw about an inch or two away.
2. Leaving Screw Heads Proud
A screw head that sticks above the drywall surface creates several issues:
- Joint compound won’t feather smoothly.
- Paint highlights the bump.
- Sanding becomes more difficult.
- The finished wall may appear uneven under bright lighting.
Each screw should sit just below the paper surface without breaking it.
3. Missing the Stud
A screw that misses the framing contributes nothing to the installation. Signs you’ve missed the stud include:
- The screw spins freely.
- The drywall doesn’t tighten.
- The screw pulls out easily.
Remove or drive the failed screw flush if appropriate, locate the framing accurately, and install a new fastener into solid backing.
4. Placing Screws Too Close to the Edge
Drywall edges can crack if screws are installed too close to the perimeter. Keeping screws roughly 3/8 inch from the edge helps preserve the strength of the paper while maintaining a secure hold.
5. Using Too Few Screws
Trying to save a handful of screws rarely pays off. Insufficient fastening may lead to:
- Loose panels.
- Cracked joints.
- Screw pops.
- Ceiling sag.
- Callbacks and repairs.
Following a consistent fastening pattern is far more effective than guessing.
6. Using the Wrong Screw Type
Using coarse thread screws in metal studs or fine thread screws in wood framing can slow the installation and reduce holding performance. Match the screw to the framing material from the start.
7. Ignoring Framing Layout
Every screw should land in solid framing. Before hanging drywall:
Mark stud locations. Snap reference lines if needed. Double check measurements around windows and doors. Verify ceiling joist direction.
Good preparation makes fastening faster and more accurate.
Toward the end of a drywall project, experienced professionals, including teams such as Pro A&M Painting when completing drywall installation and finishing as part of a remodeling project, often spend a few extra minutes checking every fastener before taping begins. Correcting a missed or overdriven screw at this stage is much easier than repairing a visible defect after the walls have been finished and painted.
Book Your Free Estimate Today!
Ready to transform your space? Our team is here to help you get started with a no-obligation, on-site estimate. Whether it’s a quick refresh or a full makeover, we’ll guide you every step of the way.
Professional Installation Tips
Professional drywall installers don’t work faster because they use shortcuts. They work faster because they follow a consistent process that reduces mistakes and keeps every sheet aligned.
If you’re installing drywall yourself, these can make a noticeable difference in the finished result.
1. Start with Straight Framing
Before hanging the first panel, inspect the framing.
Look for:
- Bowed or twisted studs.
- Loose framing members.
- Uneven ceiling joists.
- Protruding nails or screws.
- Plumbing or electrical obstacles.
Even the best screw pattern won’t produce a flat wall if the framing underneath is uneven.
2. Hang Full Sheets Whenever Possible
Larger drywall panels reduce the number of seams compared to using multiple smaller pieces.
Benefits include:
- Stronger walls.
- Fewer joints to tape Less joint compound.
- Faster finishing.
- Reduced risk of visible cracks.
Professionals usually place factory tapered edges together because they’re easier to finish than cut edges.
3. Keep Screws Consistent
Rather than randomly placing fasteners, establish a rhythm.
For every sheet:
- Follow the same spacing pattern.
- Drive screws to the same depth.
- Keep rows straight.
- Fasten every framing member.
Consistency makes the installation easier to inspect and produces a smoother surface during drywall finishing.
4. Use the Right Tools
The proper tools improve both speed and accuracy.
Helpful equipment includes:
- Drywall screw gun with adjustable depth.
- Drywall T square.
- Utility knife with sharp blades.
- Drywall lift for ceilings.
- Chalk line.
- Tape measure.
- Drywall rasp.
- Drywall panel carrier.
A screw gun with depth control is especially valuable because it helps prevent overdriving screws while maintaining a uniform finish.
5. Inspect Before Taping
Once all the drywall panels are installed, walk through the room before applying tape or joint compound.
Check for:
- Proud screw heads.
- Torn drywall paper.
- Loose panels.
- Missed framing.
- Damaged corners.
- Uneven joints.
Fixing these issues now is much easier than discovering them after the first coat of mud.
When Glue Changes Screw Requirements
Construction adhesive is sometimes used during drywall installation, particularly on walls framed with wood studs. The adhesive creates an additional bond between the drywall and the framing, helping reduce movement and improving long term performance.
However, one question often comes up: Does glue mean you can use fewer screws?
The answer is: sometimes, but only when allowed by the drywall manufacturer and local building code.
Why Professionals Use Adhesive
Construction adhesive can provide several benefits:
- Reduces drywall movement.
- Helps minimize nail or screw pops.
- Improves the bond between the panel and framing.
- Can create a flatter finished wall.
It’s most commonly applied as a continuous bead along the face of wood studs immediately before the drywall panel is installed.
Does Adhesive Replace Screws?
No. Adhesive is intended to work with mechanical fasteners, not replace them. The screws hold the panel securely while the adhesive cures and they continue to provide long term mechanical support.
Even when adhesive is used, you should still follow the fastening schedule recommended by the drywall manufacturer or your local building authority. Never reduce the number of drywall fasteners based on guesswork.
Book Your Free Estimate Today!
Ready to transform your space? Our team is here to help you get started with a no-obligation, on-site estimate. Whether it’s a quick refresh or a full makeover, we’ll guide you every step of the way.
Frequently Asked Questions
How Many Screws Per Sheet of Drywall are needed for a standard wall?
For a standard 4×8 sheet installed on wall framing spaced 16 inches on center, about 32 screws is a common professional guideline. The exact number depends on the framing layout and required screw spacing.
How Many Screws Per Sheet of Drywall are used on ceilings?
Most ceilings require 40 to 48 screws per 4×8 sheet because overhead panels are subjected to constant downward force. Closer spacing helps prevent sagging over time.
Should I use nails or screws?
Screws are the preferred choice for most modern drywall projects. Compared with nails, drywall screws:
- Hold more securely.
- Resist popping.
- Are easier to install consistently.
- Perform better during seasonal movement.
While nails may still be permitted in some situations, screws are the standard for most residential and commercial installations.
Can you use too many drywall screws?
Yes. Installing excessive screws increases labor, material costs and finishing work without providing meaningful structural benefits. It can also damage the drywall paper if fasteners are driven too closely together. Following recommended spacing is more effective than simply adding more screws.
How far should drywall screws be from the edge?
A good rule is to keep screws about 3/8 inch from the edge of the drywall panel. This helps prevent edge damage while maintaining a strong attachment to the framing.
Can I install drywall with only adhesive?
No. Construction adhesive is not intended to replace screws or other approved fasteners. Mechanical fastening is still required to secure the drywall panels and comply with accepted installation practices.
Does thicker drywall require more screws?
Not necessarily. Thicker drywall generally requires longer screws, but the fastening pattern is usually based on the framing layout, panel orientation and applicable code rather than thickness alone.
Conclusion
Understanding How Many Screws Per Sheet of Drywall is about more than arriving at a single number. A successful installation depends on using the correct screw spacing, choosing the right screw length, matching the fastener to wood or metal studs and following accepted construction standards.
For most residential projects, a standard 4×8 sheet will typically use about 32 screws on walls and 40 to 48 screws on ceilings. Those numbers provide a reliable starting point, but consistent spacing and proper installation technique are what ultimately create a durable, professional looking result.
Whether you’re finishing a basement, remodeling a bedroom or managing a larger renovation, taking the time to fasten each panel correctly will help prevent loose drywall, cracked joints and costly repairs later. When a project calls for professional drywall repair or installation as part of a painting or remodeling job, Pro A&M Painting understands that careful preparation and proper fastening are the foundation of a smooth, long lasting finish.